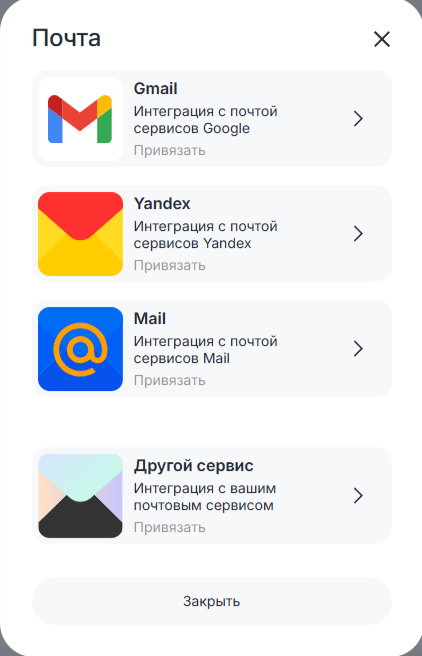
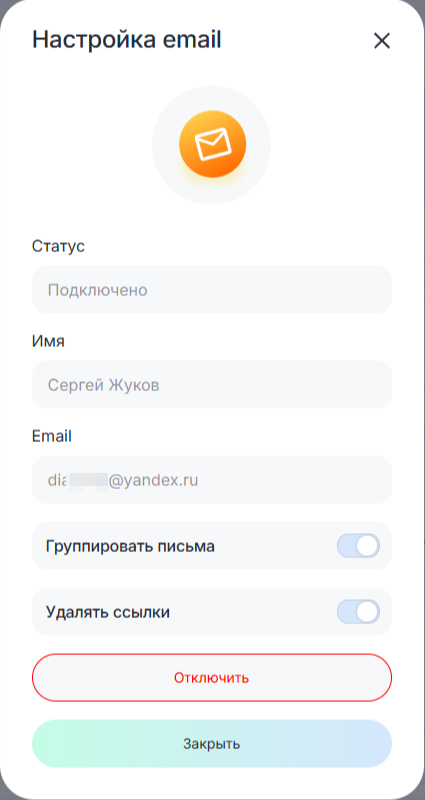
Подключение Email
1. Нажмите на кнопку «Привязать» напротив «Email».
2. Выберите из списка, какой почтовый сервис вы подключаете.
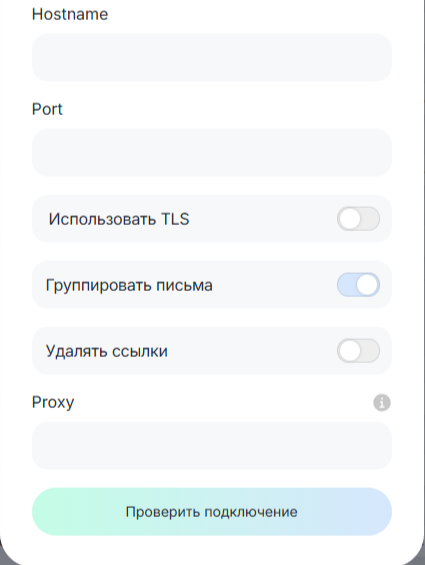
1) Чтобы ссылки отображались в сообщениях, выключите опцию «Удалять ссылки».
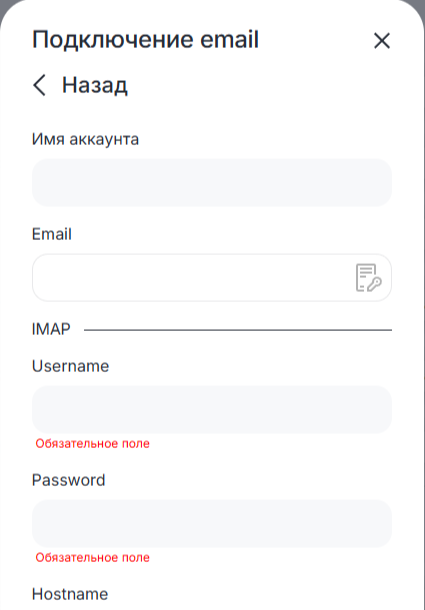
2) В поля «Username» и «Password» введите адрес почты и пароль от почтового аккаунта. Включите использование TLS. «Hostname» и «Port» для каждого почтового сервиса отличаются.
3) Примеры настроек для стандартных почтовых сервисов:
|
Наименование
|
IMAP
|
SMTP
|
|
Gmail
|
Hostname: imap.gmail.com
Port: 993
|
Hostname: smtp.gmail.com
Port: 587
|
|
Yandex
|
Hostname: imap.yandex.com
Port: 993
|
Hostname: smtp.yandex.com
Port: 587
|
|
Mail.ru
|
Hostname: imap.mail.ru
Port: 993
|
Hostname: smtp.mail.ru
Port: 587
|
В Dialogs.Pro попадают все сообщение из привязанной почты. Email адрес используется как имя пользователя. Тема пишется в соответствующем поле, отдельно от текста письма.
Gmail
1. Выполните предварительную настройку сервиса в почтовом клиенте Gmail согласно инструкции в открывшейся форме.

2. Нажмите на поле “К авторизации”.
a) В поле «Email» введите Email и нажмите на значок  . Данные «Hostname» и «Port» заполнятся автоматически.
b) В поле «Username» введите почту.
c) В поле «Password» введите пароль приложения.
d) Выберите, хотите ли вы группировать письма и по умолчанию удалять из них все ссылки.
Если пункт «Группировать письма» включен, то в названии чата будет отображаться тема письма. Каждая тема попадает в отдельный чат.
Если пункт «Группировать письма» отключен, то в названии чата будут отображаться данные электронной почты, а тема письма будет указана в начале сообщения в квадратных скобках. Все сообщения c этого адреса попадут в один чат.
Включение опции «Удалять ссылки» скрывает отображение ссылок в сообщении.
3. Нажмите «Проверить подключение».
4. После небольшой загрузки нажмите «Подключить». В настройках линии отобразится, что канал Email подключен.
Yandex
1. Выполните предварительную настройку сервиса в почтовом клиенте Yandex согласно инструкции в открывшейся форме.

2. Нажмите на поле “К авторизации”.
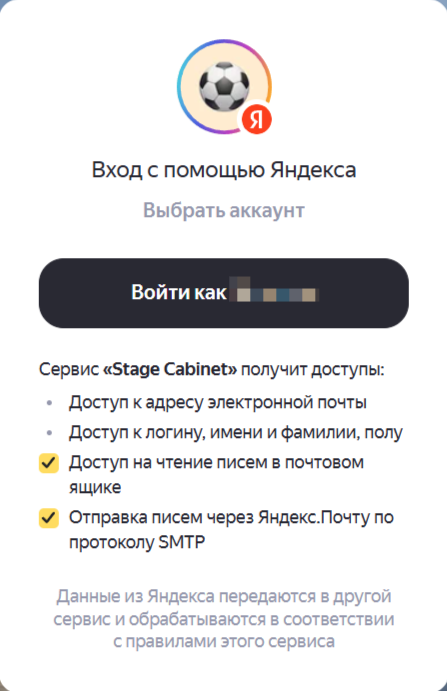
3. Нажмите на поле “Войти как…” для входа под активным аккаунтом или на поле “Выбрать аккаунт”, чтобы изменить вход.
Выберите, хотите ли вы группировать письма и по умолчанию удалять из них все ссылки.
Если пункт «Группировать письма» включен, то в названии чата будет отображаться тема письма. Каждая тема попадает в отдельный чат.
Если пункт «Группировать письма» отключен, то в названии чата будут отображаться данные электронной почты, а тема письма будет указана в начале сообщения в квадратных скобках. Все сообщения c этого адреса попадут в один чат.
Включение опции «Удалять ссылки» скрывает отображение ссылок в сообщении.
4. Нажмите на кнопку «Закрыть».
1. Выполните предварительную настройку сервиса в почтовом клиенте Mail согласно инструкции в открывшейся форме.
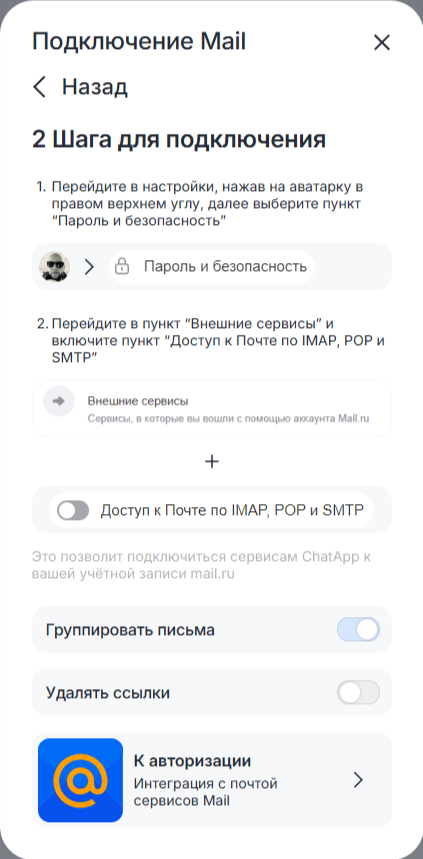
2. Нажмите на поле “К авторизации”.
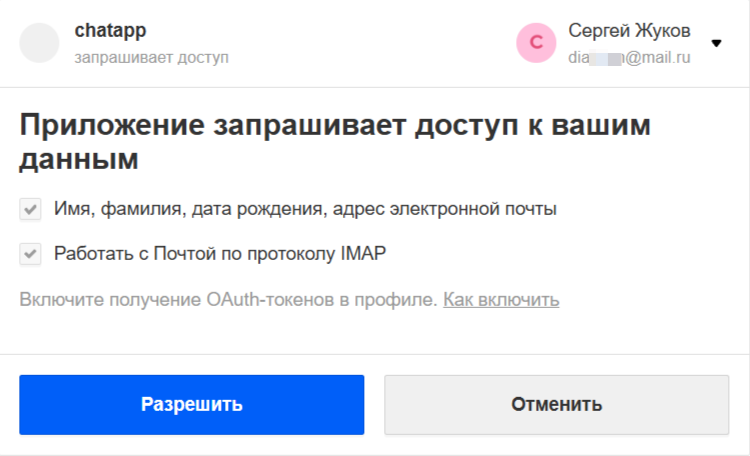
3. Нажмите на кнопку «Разрешить».

Выберите, хотите ли вы группировать письма и по умолчанию удалять из них все ссылки.
Если пункт «Группировать письма» включен, то в названии чата будет отображаться тема письма. Каждая тема попадает в отдельный чат.
Если пункт «Группировать письма» отключен, то в названии чата будут отображаться данные электронной почты, а тема письма будет указана в начале сообщения в квадратных скобках. Все сообщения c этого адреса попадут в один чат.
Включение опции «Удалять ссылки» скрывает отображение ссылок в сообщении.
4. Нажмите на кнопку «Закрыть».
Другой сервис
1. Выполните предварительную настройку сервиса. Разрешите доступ к почтовому ящику с помощью почтовых клиентов. Для этого необходимо включить протоколы IMAP и SMTP.
2. Заполните поля формы подключения.
a) В поле «Email» введите Email и нажмите на значок  . Данные «Hostname» и «Port» заполнятся автоматически.
b) В поле «Username» введите почту.
c) В поле «Password» введите пароль приложения.
d) Выберите, хотите ли вы группировать письма и по умолчанию удалять из них все ссылки.
3. Нажмите «Проверить подключение».
4. После небольшой загрузки нажмите «Подключить». В настройках линии отобразится, что канал Email подключен.