1. Go to Selected company section in the left menu and select the line with the purchased Email channel.

2. Find Email in communication channels and click connect.

3. Select an email service.

1. Create a password for the apps. Use Google's instructions;
2. Copy the password to the clipboard;
Note: as a rule, it is enough to enter this password once, so it is not necessary to memorize it;
3. Click To authorization;
4. In the Email field, type Email and click the  icon. The Hostname and Port data will be filled in automatically;
5. Enter your email in the Username field;
6. Enter the application password in the Password field;
7. Choose whether you want to group emails and remove all links from them by default;

8. Click Verify connection;
9. After a short download, click Connect.
Connection will be displayed in the line in your personal cabinet.
1. Select whether you want to group emails and remove all links from them by default;
2. Click on Yandex and To authorize;

3. Click Log in as...
4. After a short download, the mail will be connected to the line;

If the connection fails, check your mail settings.
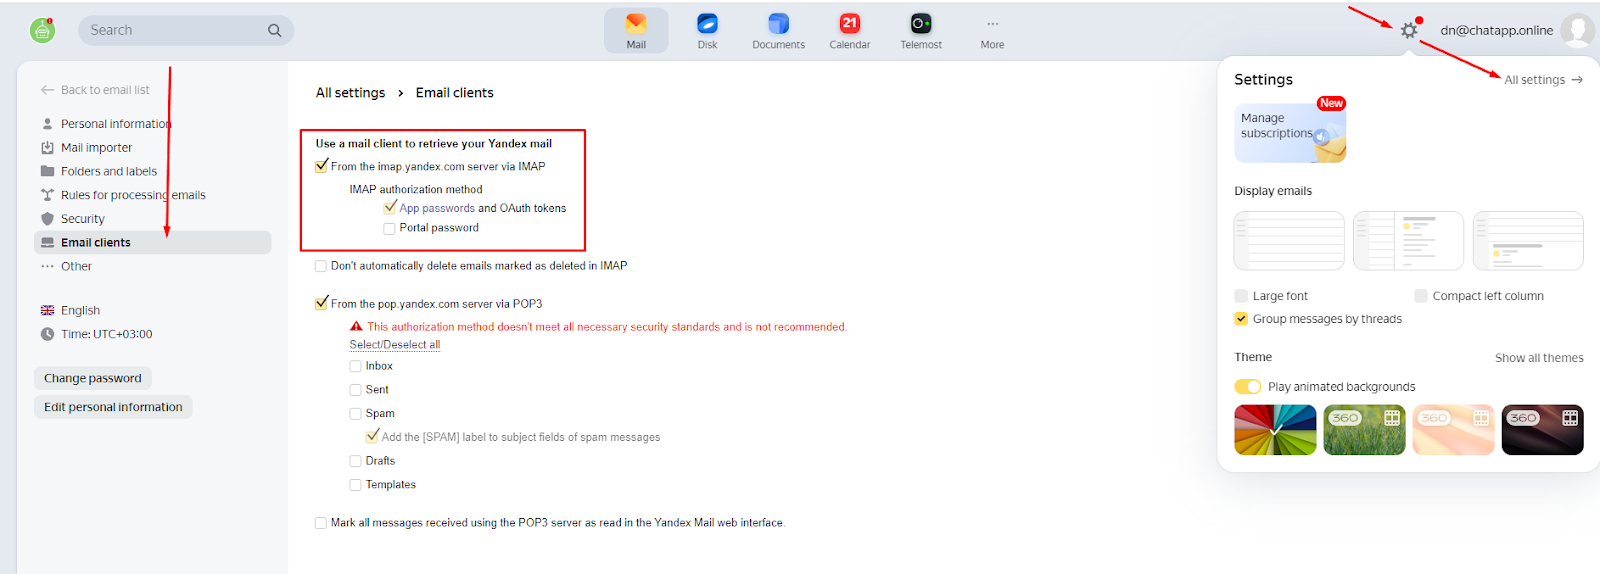
Go to Yandex mail and go to Settings -> Mail programs
There should be a check mark in the From imap.yandex.ru server via IMAP box.
And put a checkmark in the Application passwords and OAuth tokens box.
1. Select whether you want to group emails and remove all links from them by default;
2. Click on Mail.ru and To authorize;

3. Give ChatApp access to your data;

4. After a short download, the mail will be connected to the line
You may need to enable mail access for external services.
Go to Password & Security → Third-party services.

5. Channel connected successfully.

1. First, you need to allow access to the mailbox using mail clients. To do this, you need to enable IMAP and SMTP protocols. The location of these settings may differ in different mail services, so it is recommended to contact the technical support of your mail service for exact information;
2. Type your email in the Email tab and click the  icon. The Hostname and Port data will be filled in automatically.
3. Enter your email in the Username field;;
4. Enter a password in the Password;
5. Select whether you want to group emails and remove all links from them by default;
6. Click Verify connection;
7. After a short download, click Connect.
To display links in the post turn off the Remove links option.

The ChatApp Dialog receives all messages from the linked mail.
The Email address is used as the username.
The subject of the email is written in [Square Brackets] or (Round Brackets), then you must be sure to write the message on a new line.
Grouping e-mails
If the Group e-mails option is enabled, the subject of the e-mail will be displayed in the chat name. Each subject goes to a separate chat.
If the Group e-mails option is disabled, the e-mail data will be displayed in the chat name, and the subject of the e-mail will be indicated in square brackets at the beginning of the message. All messages from this address will be included in one chat.