In this guide, we'll show you how to configure Bitrix24 to send and receive webhooks. We will teach the ChatApp bot to request a rating when a card is moved to a new stage of the pipeline, and at the end insert a rating or client comment from a message into the same card. There are 3 steps to set this up:
Step 1: Configure Bitrix24 to accept webhooks
This is a preparation step. It is needed to get the link for the outgoing request, which will change the field in the card at the end of the script.
1. Go to Bitrix24 → click "Developer resources" → "Other" → "Inbound webhook".
2. In "Assign permissions", select "CRM".
3. Copy the "Webhook to call REST API" and keep it with you. You will need it later to create the "Send request" in the ChatApp bot.
4. Click save.

Step 2: Configure the bot in the ChatApp script editor
1. Go to the script editor;
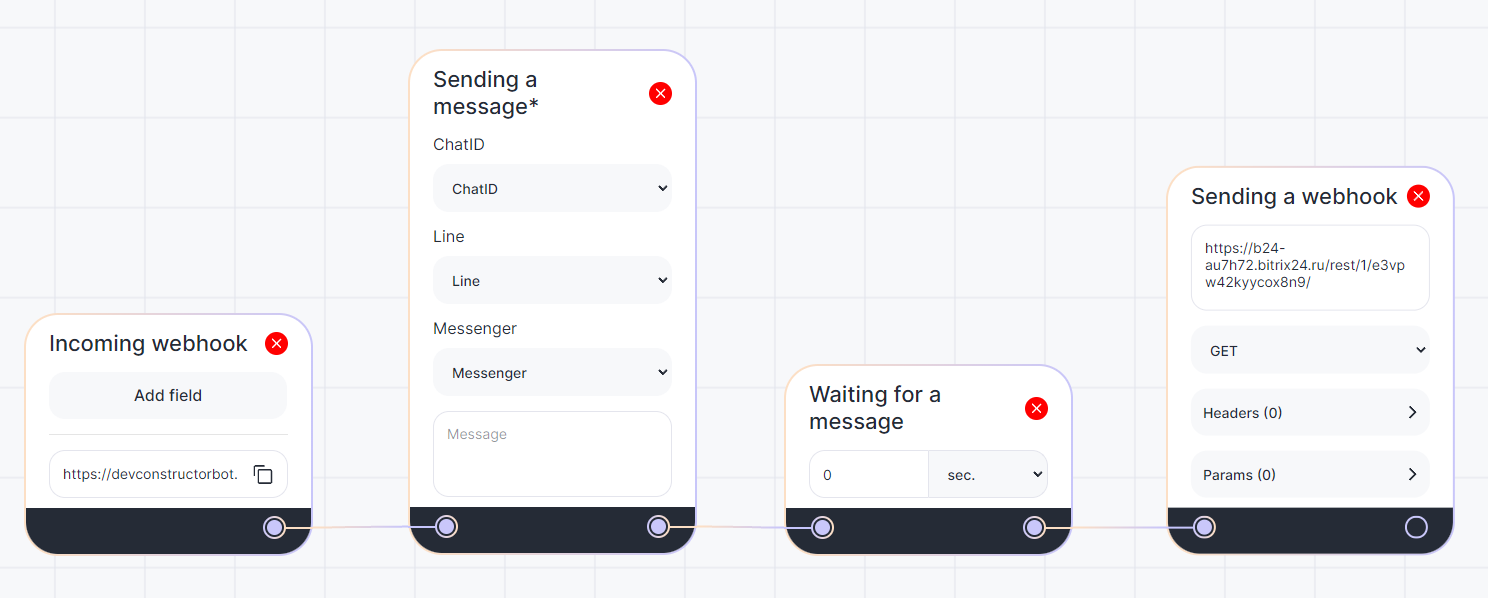
2. Create a Webhook block;
4. Create the "Send Message*" block;
5. Create the "Waiting for message" block;
6. Create the "Send a webhook" block;
7. Paste the previously copied link "Webhook for rest api call" + /crm.deal.update
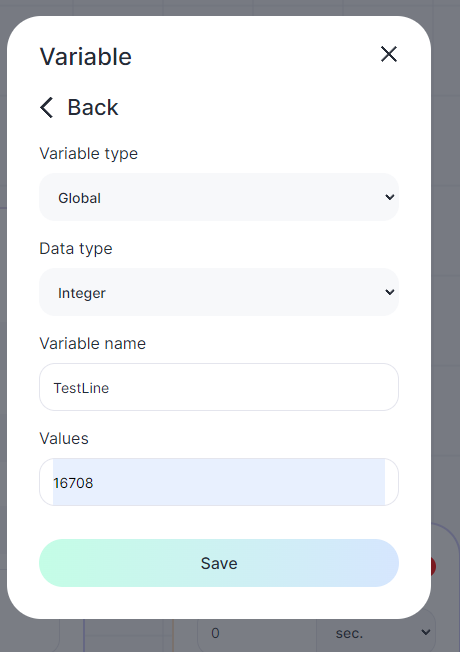
8. On the top right click "Variables" and create variables by clicking on :
- Global, integer, with any name in latin alphabet. In the value you need to enter the id of the line — it can be found in your personal account in "My Business" or in the system variables.
- Global, a string, with any name in Latin. The messenger should be entered in the value. Available values can be copied from system variables.

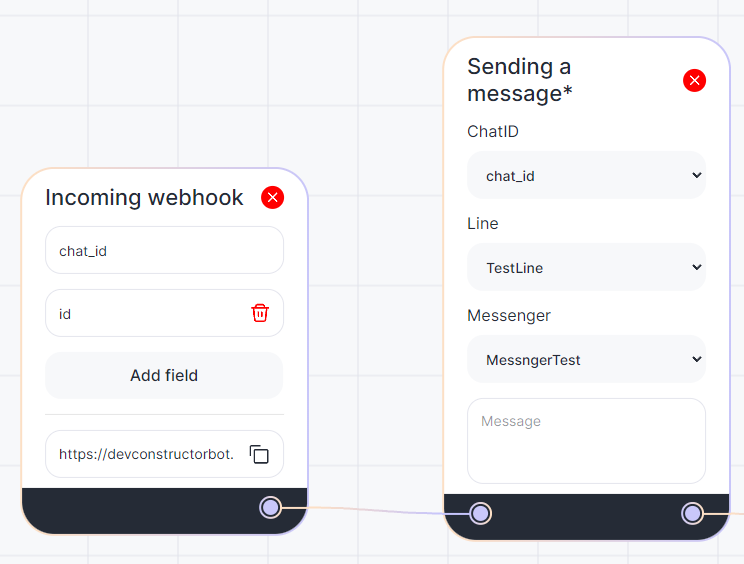
9. In the "Incoming webhook" block, create 2 fields and type "chat_id" in one and "id" in the other. Local variables with the same name will be automatically created.
10. In the "Send message*" block, select:
- In "ChatID", the chat_id variable;
- In "Lines", the line id variable you created;
- In "Messenger", the messenger variable you created.
- Enter the text of the message.
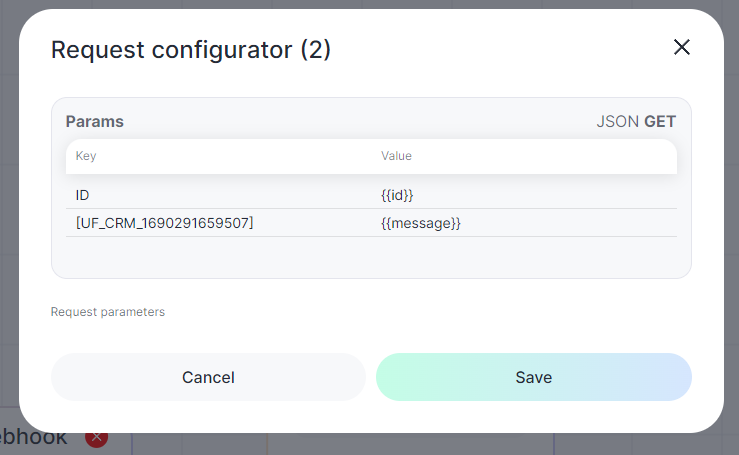
11. In the "Sending a webhook" block, go to "Params":
- In "key" enter "ID" and the field ID in Bitrix24, entered in square brackets [ ] so that Bitrix24 understands which card and which field to change.
1. Go to the Custom Fields in Bitrix24.

2. Add a new field or select from existing fields.

3. Select an existing field by clicking on its name.

example: PHONE, EMAIL, UF_123123332
Standard field codes can be found here: lead, deal, contact, company
User field codes must be taken from the url when visiting the field editing page. For example: https://portal.bitrix24.ru/crm/configs/fields/CRM_LEAD/edit/UF_CRM_614D2FEF694EE/ - here UF_CRM_614D2FEF694EE - this is the desired id (code) of the field.
Only non-multiple string fields are supported for user-defined fields.
Field saving logic:
When information is received for saving from the bot, a special system message is sent to the OL chat (you cannot without it).
Then we get the linked entities to the chat at the moment (lead, deal, contact, company).
On the found entities, we try to establish the transmitted data.

Important: It is necessary to have a company in the "My Business" module, in the settings of which the bitrix portal must be connected to the company.
1. Open a card in Bitrix 24.
2. Right click on the desired field.
3. Select "Inspect".
4. Copy the field ID (what is opposite "name=").

- In "value" enter {{id}} and {{message}} (these should be selected from the dropdown values after entering "{{" so that the Bitrix24 bot understands which values to insert.
12. Click “Save” and “Publish”
Step 3. Add an outbound webhook to the Bitrix pipeline
1. Copy the link from the "Incoming Webhook" block;
2. Go to Bitrix → CRM → Deals → Kanban → Automation rules;
3. Add the "Outbound Webhook" Automation rule to the desired column;
4. In the "Handler:" field, paste the copied link from the "Incoming Webhook" block;
5. Add the required parameters. In our example, these are chat_id and id. They are added to the link via the "&" symbol. An example of a ready link is on the screenshot:

6. Click “Save”.
Done! Now, when you move a deal card to the column of your choice, the bot will send a message to the client. The client's reply will appear in the field you selected in CRM.