Инвайтер ChatApp используется для добавления контактов в группы Telegram или WhatsApp. С помощью него можно настроить отправку приглашений в группу всем своим контактам через подключенные мессенджеры.
Для отправки приглашений не нужно использовать сторонние сервисы или приложения. Все настройки производятся в Личном кабинете.
После настройки и запуска Инвайтера выбранным контактам рассылаются приглашения на вступление в группу Telegram или WhatsApp.
Важно: для рассылки приглашений нужна роль Администратора.
Настройка Инвайтера
Шаг 1. Добавьте новую запись Инвайтера
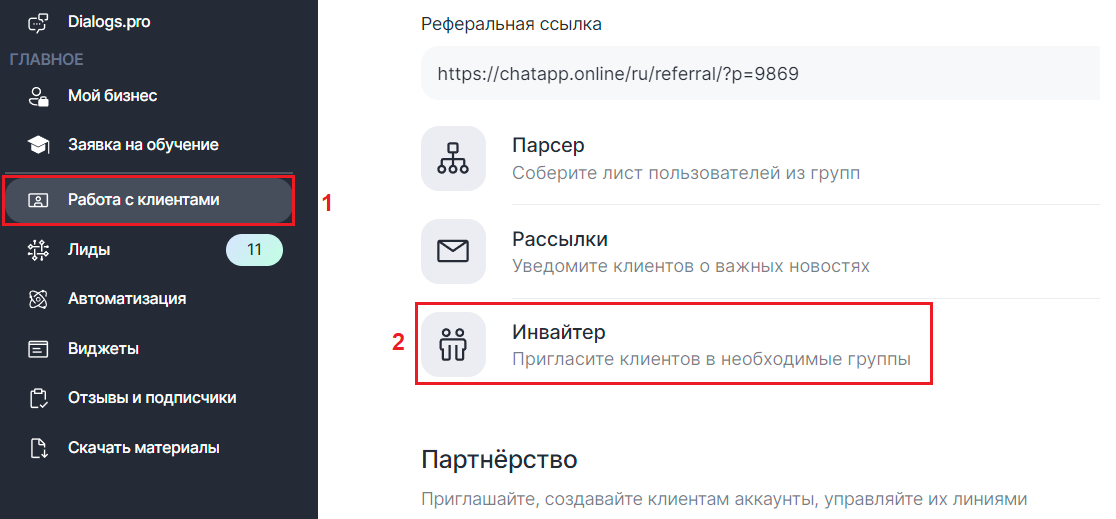
1. Перейдите в Личный кабинет ChatApp — раздел «Работа с клиентами».
Выберите пункт «Инвайтер» в левом боковом меню.

2. В меню Инвайтера в правом верхнем углу выберите нужный мессенджер — Telegram или WhatsApp.

Шаг 2. Выберите время отправки сообщений
В новом окне введите название новой записи Инвайтера, выберите дни работы, укажите дату начала и окончания, временной интервал и диапазон отправки приглашений.
Для работы с группами Telegram рекомендуем использовать интервал не менее 20 минут между отправкой приглашений, иначе может быть риск блокировки аккаунта.
Для работы с группами WhatsApp используйте интервал не менее 1 минуты, иначе может быть риск блокировки аккаунта.
Шаг 3. Выберите линию и группу
1. Выберите линию, с которой будут рассылаться приглашения. Можно выбрать несколько линий и настроить отправку поочередно с каждой из них.
2. Выберите группу, в которую будут приглашены пользователи (можно выбрать несколько групп), затем нажмите на кнопку «Загрузить группы».

Шаг 4. Добавьте контакты для приглашения в группу
Важно: в рассылку по группам WhatsApp можно добавить только пользователей, которые есть среди контактов аккаунта отправителя (подключенного к линии). Если номер пользователя отсутствует в списке контактов аккаунта WhatsApp, рассылка до него не дойдет.
Все контакты для рассылки приглашений будут отображены в таблице. Добавить контакты можно несколькими способами:
1. Вручную по-одному.
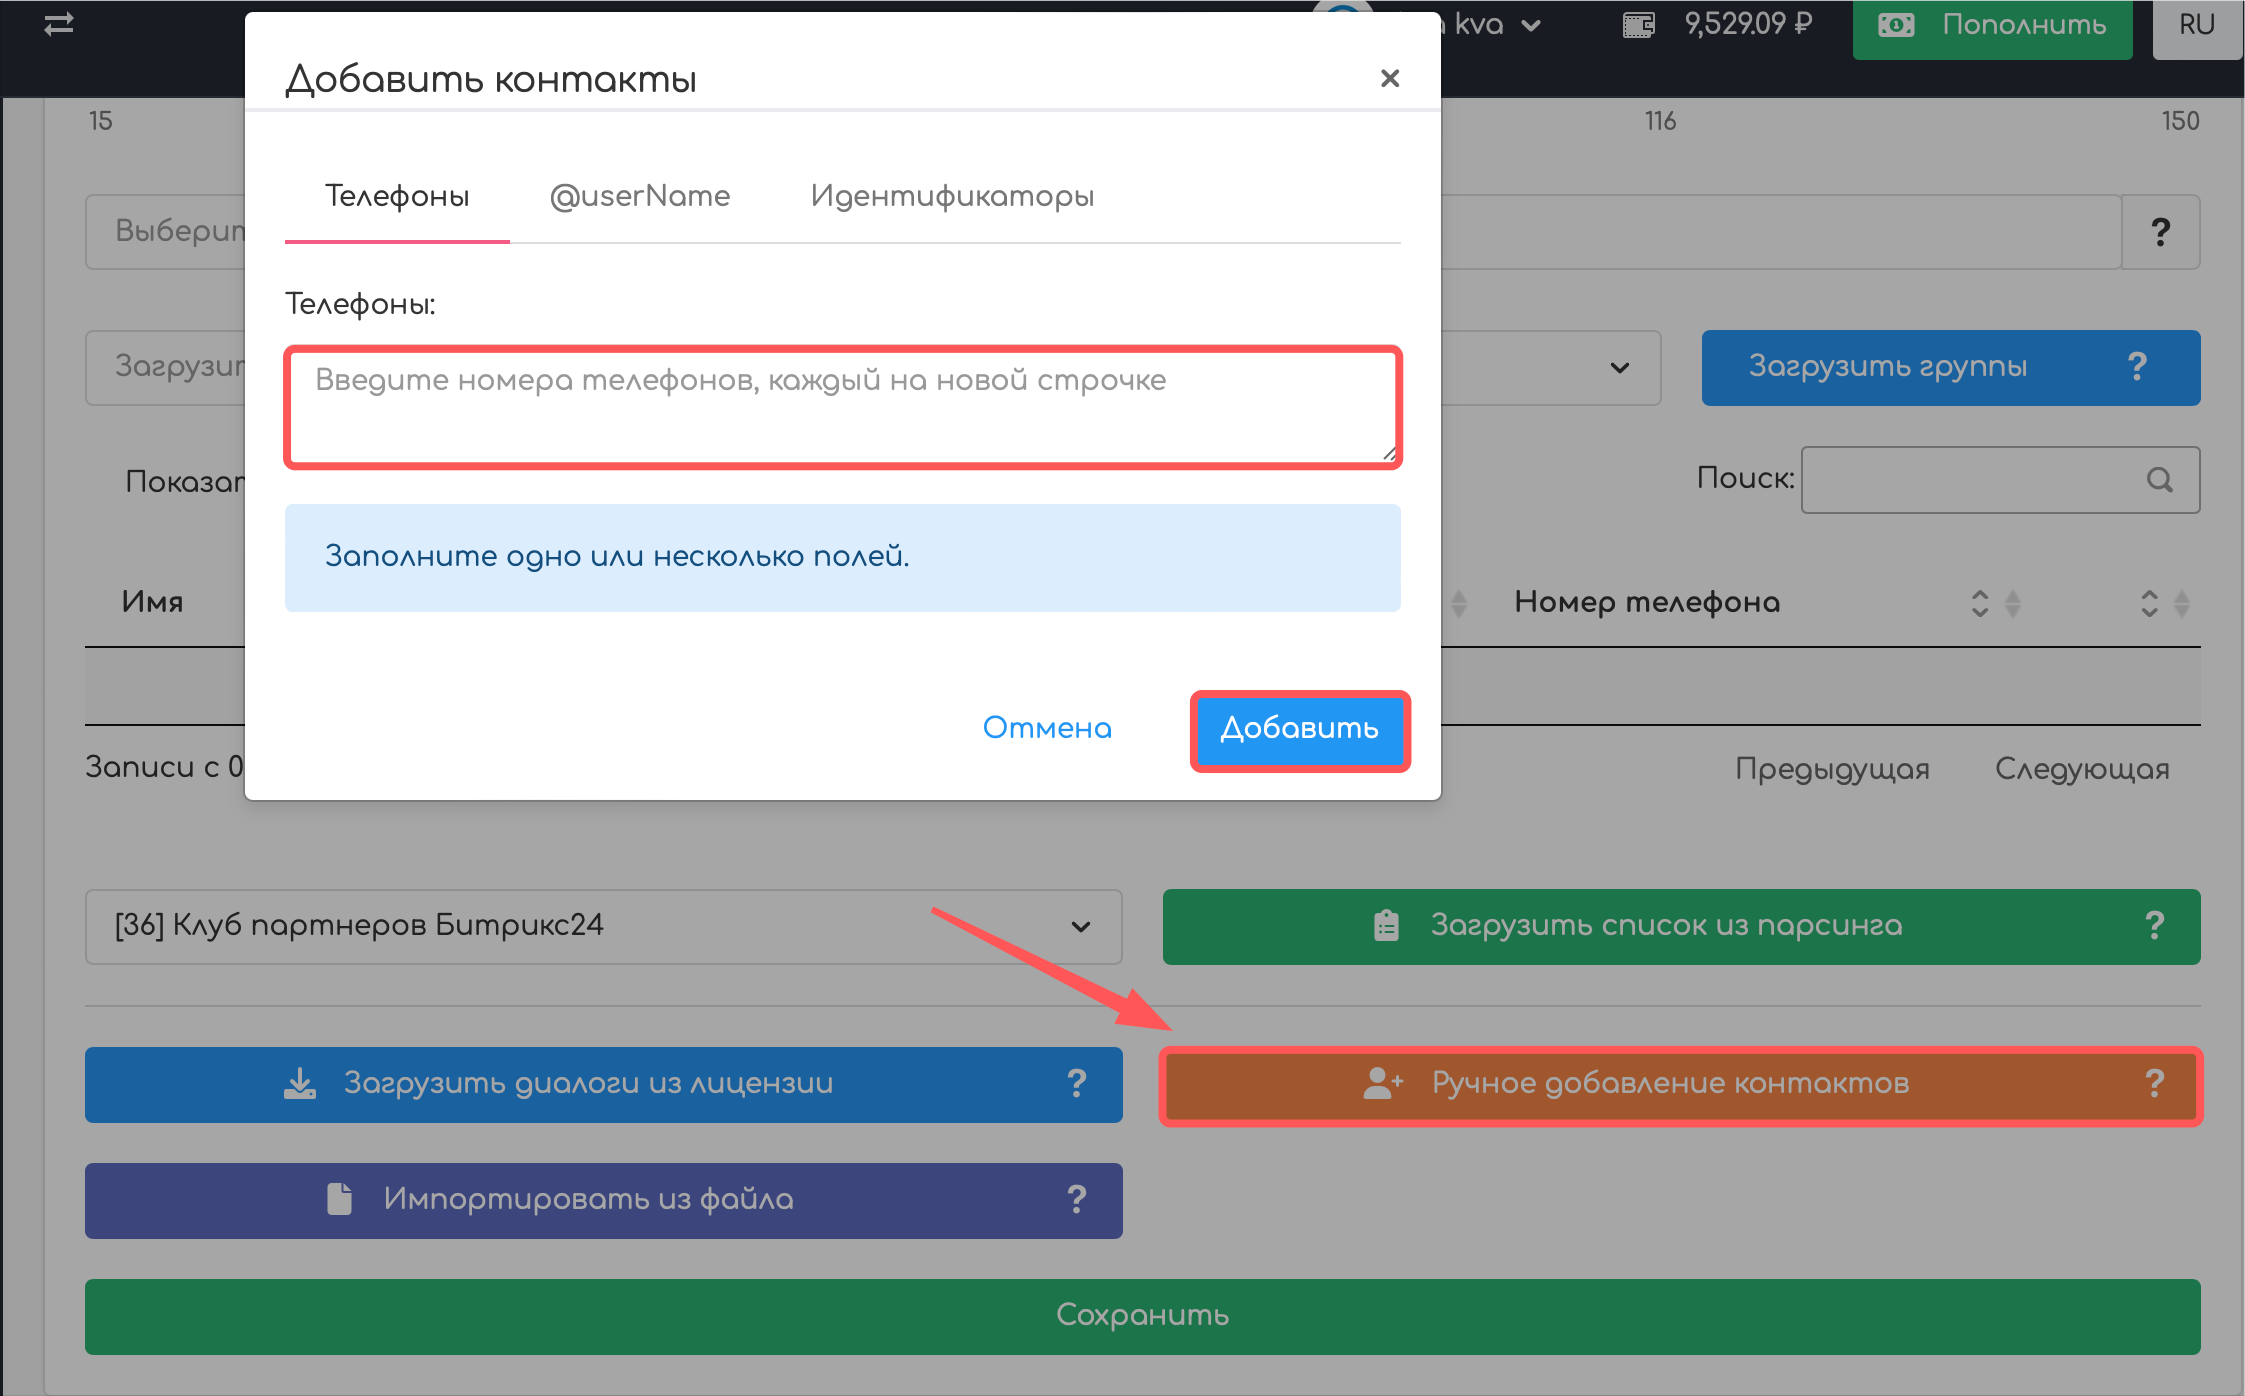
Нажмите на кнопку «Ручное добавление контактов», а затем выберите способ связи с контактом:
- Номер телефона, @username, ID чата — для Telegram;
- Номер телефона — для WhatsApp.
Введите данные контакта и нажмите на кнопку «Добавить». Контакт будет добавлен в таблицу.

2. Загрузить диалоги из линии. Выберите нужную линию с привязанными каналами Telegram или WhatsApp.
Нажмите на кнопку «Загрузить диалоги из линии», чтобы все диалоги из выбранной линии отобразились в таблице.

3. Добавить контакты из Парсинга. С помощью Парсинга можно собрать контакты пользователей групп в Telegram и добавлять их в рассылки Инвайтера.
Выберите группу Парсинга из выпадающего списка. Нажмите на кнопку «Загрузить список из Парсинга» и таблица автоматически заполнится данными контактов из выбранной группы Парсинга.

4. Загрузить файл с контактами. Нажмите на кнопку «Импортировать из файла».
- Скачайте пример файла формата СSV и внесите данные контактов в соответствующие поля файла.
- Загрузите готовый файл.
- Нажмите на кнопку «Добавить». Все данные контактов из файла будут отображены в таблице контактов Инвайтера.
Шаг 5. Сохраните новую запись Инвайтера
Когда все поля Инвайтера заполнены, нажмите на кнопку «Сохранить».
Отправка приглашений Инвайтером
Перейдите в Меню управления и настройте запуск рассылок:
 «Запуск» Инвайтера с сохраненными настройками.
 «Приостановить» отправку приглашений с возможностью продолжить.
 «Остановить» отправку приглашений.
Выберите нужное действие.

После запуска Инватер начнет рассылать приглашения в группу выбранным контактам.
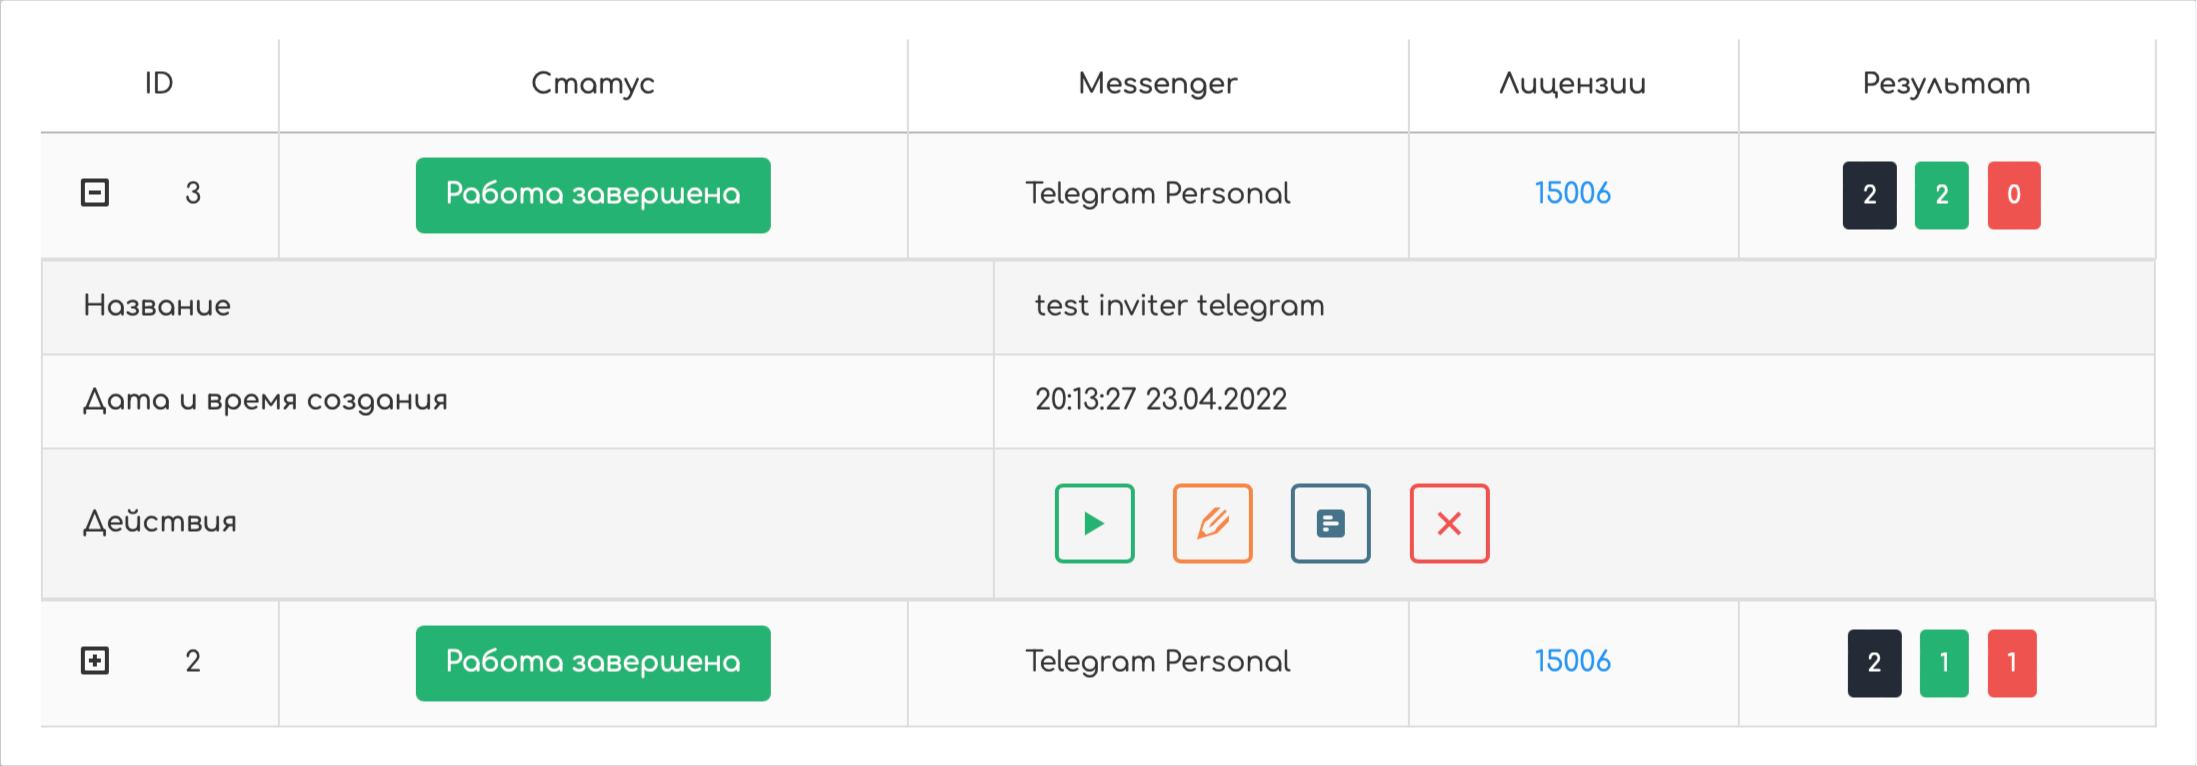
Процесс работы Инвайтера отображается в колонке «Статус». Когда рассылка завершена, статус «В работе» меняется на статус «Работа завершена».
Редактирование записи Инвайтера
Когда отправка приглашений закончена или остановлена, можно внести Изменения в запись Инвайтера, Просмотреть статусы отправки приглашений или Удалить выбранную запись:
 «Редактирование» записи Инвайтера для дополнения контактов и других изменений.
 «Удаление» записи Инвайтера.
 «Просмотр статусов» отправки приглашений.
Результаты отправки приглашений отображены в правой колонке:
- Общее количество запросов — количество приглашений, которые нужно было отправить.
- Количество отработанных запросов — количество приглашений, которые удалось отправить.
- Количество неудавшихся запросов — количество приглашений, которые не удалось отправить.
