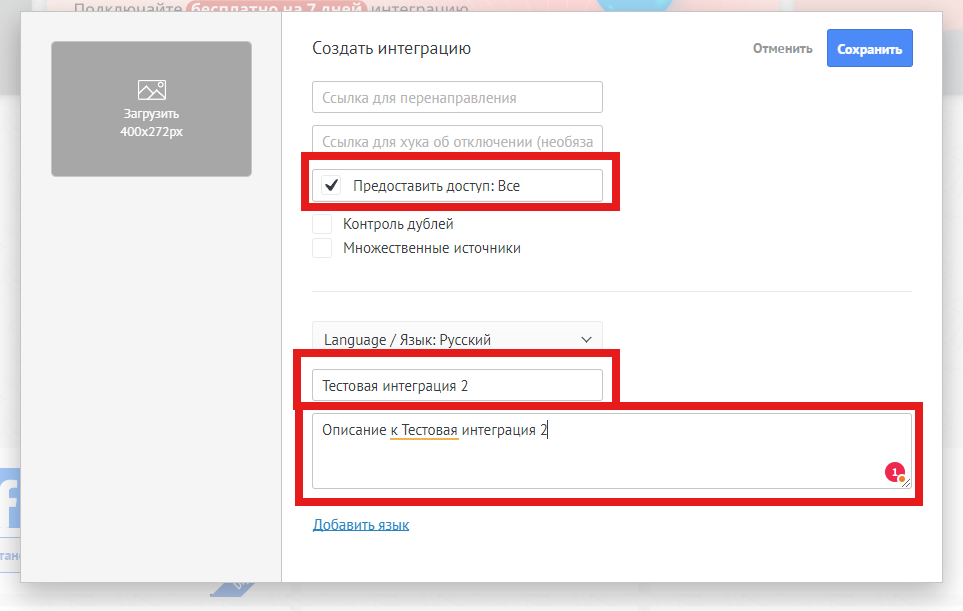
Создайте внешнюю интеграцию на странице AmoМаркет
- Перейдите в раздел “AmoМаркет”.
- В правом верхнем углу нажмите “…”.
- Выберите “Создать интеграцию”.
- Нажмите на “Внешняя интеграция”.
- Выберите “Предоставить доступ: все”.
- Заполните поля “Название” и “Описание”.
- Нажмите “Сохранить”.

Сгенерируйте “Долгосрочный ключ” для интеграции
- На странице “AmoМаркет” откройте вкладку “Установленные”.
- Найдите вашу интеграцию и кликните по ней.
- Перейдите в раздел “Ключи и доступы”.
- Нажмите на кнопку “Сгенерировать” для создания долгосрочного ключа.
- Сохраните этот ключ — он понадобится вам при настройке конструктора ботов.
Соберите сценарий в конструкторе ботов
Перейдите в конструктор ботов и выполните следующие шаги:
- Входящий webhook — добавьте блок для получения данных через webhook.
- API запрос — создайте GET-запрос к вашему AMOcrm:
https://{{ваш домен AMOcrm}}/api/v4/contacts.
В параметрах Headers добавьте поле “Authorization” и значение “Bearer {{долгосрочный ключ}}”. - Изменение переменной 1 — присвойте переменной i значение 0.
- Изменение переменной 2 — присвойте переменной contact_type значение из API-запроса:
{{...data._embedded.contacts[i].custom_fields_values[1].values[0].value}}. - Условие 1 — проверьте, равен ли contact_type значению “кадровый резерв”.
- Если true, подключите к блоку Пауза.
- Если false, подключите к блоку Отправка сообщения 1.
- Отправка сообщения 1 — отправьте сообщение по ChatID, используя результат API-запроса:
{{...data._embedded.contacts[i].custom_fields_values[2].values[0].value}}. - Пауза — добавьте паузу на 1 секунду.
- Условие 2 — проверьте, если i >= 200.
- Если true, подключите к блоку Отправка сообщения 2.
- Если false, подключите к блоку Программатор.
- Программатор — создайте функцию:
{{i}} + 1. Соедините его с блоком Изменение переменной 2.

Убедитесь, что сценарий настроен правильно. Пример сценария доступен по ссылке:
Сценарий.
Настройте воронку сделок в AMO
- Перейдите в раздел “Сделки” в AMO.
- В правом верхнем углу нажмите “Настроить воронку”.
- Удалите все ненужные стадии.
- Переименуйте оставшиеся стадии в “Запуск рассылки” и “Проведена рассылка”.
- На стадии “Запуск рассылки” добавьте триггер “Webhook”.
- В поле “Укажите URL” вставьте ссылку из блока “Входящий webhook” конструктора ботов.
- Добавьте триггер “Смена статуса”.
- Укажите выполнение через 2 минуты и смену на этап “Проведена рассылка”.
- Сохраните воронку.
Теперь осталось добавить сделку на этапе “Проведена рассылка” и дождаться сообщения от бота.